Yellow chick video tutorial with free PDF pattern
I created a step by step video of my process for making a needle felted chick. In it, I show you how to create a realistic yellow chick.
If you’d like to felt along, download my free PDF pattern. You’ll see me use it in the video below!
If you’d like a written reference, I’ve included the steps and a supply list below.
If you’d prefer to purchase a completed needle felted chick, check out my Etsy shop. The two that I made while creating this tutorial are available for adoption.
Step by step instructions
Download and print the free baby chick PDF pattern on an 8 1/2″ x 11″ piece of paper.
Armature
- Cut the wires for the armature. You’ll need four 15” pieces and two 4 ½” pieces of 22g copper or another 22g craft wire.
- Start by aligning the 15” pieces. Holding them together, bend them in half at the center. Lightly twist the wires 2 ⅝” down from that center bend. This will be the chick’s head and spine.
- Next, split the wires into two sections (each section will have two wires). Twist each section 2 ½” down to create the chick’s legs.
- Bend each leg out ¼” from the spine to create the hips.
- Bend each leg ¾’ forward to create the top of the thigh, ¾” backward to create the chick’s ankle, ¾” forward to create the top of the foot.
- Bend the looped end of the spine up at 1 ⅛” to create the head and neck. Bend the end with the loop down and forward at the ½” mark to create the head. Align the curve of the spine with the pattern.
- Arrange the toes so 3 wires face forward and one faces back.
- Lay the toes on the foot pattern. Trim each toe to the length of the pattern or a little longer if you’d like longer claws.
- File the end of each toe to remove any sharp points.
- Fold each wing wire in half and lightly twist it down 1 ¾” from the fold.
- Bend each wing wire to match the wing pattern. Make a bend ¼’ from the fold. Bend again ⅝” up from the first bend. The armature is complete!
Core wool base
- Tear off thin strips of core wool to cover the bare wire. Lightly coat small sections of the head, neck and spine wire with white glue (I used Elmer’s), Wrap the core wool over the glue.
- Continue gluing and wrapping core wool down the upper thigh wires and half way down the second bend of each leg. Leave the lower legs and feet bare for now. We’ll cover them with orange merino wool later.
- Take a look at a few reference photos or real chicks. After I did, I changed my mind about the wire loop for the head. It will make the head sit too far forward. Bend that wire in and flatten it to the neck. To make it easier to build the core wool up on the legs, gently push the two front outer toes in toward the middle toe. The legs should be about ⅞” apart.
- Start building up the upper legs (over the wool you glued to the wire) using thin strips of core wool. Felt it in place as you go. Try to keep the legs symmetrical. Whatever you do to one, immediately do that to the other. It’s easier than completing one and trying to remember what you did later.
- Create wool pads to create the chick’s behind, belly and chest. Attach them to the chick. Wrap more core wool strips or add small sections of core to build up the rest of the body, the neck and the head. Check reference photos along the way and watch my video tutorial to see how I slowly built up my chick.
- Make a triangle shaped tail and attach it. Keep adding wool and felting until the core wool is approximately the same size as the chick on the left side of the PDF pattern (the one without the fluff). Take your time. The core wool should be felted fairly firm so it will hold its shape when you attach the yellow fluff.
Beak and eyes
- Mark the tip of the beak and each eye with short florist pins or a marker. Pull off a small amount of pale peach merino top, tear or cut it into approximately 1’ long pieces. Restack those to create a mini batt. Felt a small triangle shape leaving the base of the triangle fuzzy to attach. Form it into a cup to make a top or bottom beak (depends on the size) of your chick’s face. The top beak should be wider and thicker than the bottom. Draw a plus sign with an air erase marker over the pin for the beak. Remove the pin and attach the beak using the ends of the plus sign to line up the beak. Tack the beak to the head but don’t felt it firmly until you add the eyes (in case you need to adjust the beak).
- Felt a divot around each pin you placed for an eye to help inset the beads. Thread your needle and make sure it will go through your beads. I used 6mm black beads. Sew the eyes in place and knot the thread at the back of the head. Felt a little core wool over the knot being careful not to cut the thread with your felting needle. Then finish felting your beak in place.
- Add a wisp of black merino top around each eye to outline the eye and help cover the core. Add small amounts of gray merino top around each eye to create eyelids. Make sure you cover the holes in the beads.
- Add a thin line of brown merino in between the top and bottom sections of the beak to define them.
Wrap the feet
- Use your pliers to position the toes of each feet. I open them a little wide so it’s easier to wrap wool around them. Tear off thin ribbons of orange merino top. Add a little craft glue to the wire. Wrap merino around the ankle and down the first toe but leave about ⅛” of wire showing at the end of the toe to suggest a claw. Do the same for the remaining toes. Wrap up the leg all the way to the core wool. Add more wool if you need to until you are happy with the thickness. Then wrap the second foot and leg.
- Use a soft paint brush to coat the legs and feet with a 50/50 mix of glue and water. Try to blue the glue mix on in the direction that the wool was wrapped (so you don’t accidentally disturb the wrap). I pressed the glue mix into the wool with my fingers and blotted any excess off with a paper towel. Let it dry and then trim away any stray fibers.
Add the fluffy top coat
- Look at reference photos. This one is particularly helpful. Two chicks in grass – image by Melanie from Pixabay.
- Using an air erase marker, draw the edges of the beak and the shorter fluff area around the eye. Fill this are in by felting in small sections of DHG duck fluff with a medium and then fine needle. The duck fluff fiber mix is quite fine and will show the poke marks from the needle. In this case, that works well to mimic the texture that you see on the actual chick.
- To apply the fluffy top coat, you’ll use both a fur and shingling technique. I have a short demo of both in the video tutorial. Start by shingling the chick’s belly and the lower portion of the behind.
- For the head, use the fur technique and pay attention to the shapes you see in photos of chicks. Trim the fiber as you go. It will need to be shorter and thicker on the head than on the rest of the body. I used a small awl to help me pick or comb the wool and a mascara brush to comb out any stray trimmings. To protect the head while you work on the rest of the body, you can cover it with plastic kitchen or food wrap. Pin it in place with the short florist pins.
- Use the shingling technique to cover the chest. Fill in any bare spots by adding small amounts of wool with the fur technique. Remember to keep trimming and combing the fuff as you go!
- Felt the lower parts of the legs all the way around the body. Then, fill in the entire body. Keep looking at reference photos as you trim.
Wrap and attach the wings
- Tear off thin strips of core wool to cover the bare wing wire. Lightly coat the wire but leave the top half inch or so bare. This is the part you’ll glue into the body so it does not need wool over it. Wrap the core wool over the glue.
- Continue gluing and wrapping core wool until you’re happy with the thickness. Take some wider strips of wool and loosely wrap those around the wire closest to the body to make a triangular shape. Needle felt the triangle to make a little wing.
- Pull off some more wool to attach to the wing to give it a feathered edge. Needle felt this wool from the top. Then flip the wing over to needle felt the other side leaving the feathered edge unfelted and fluffy. Trim the wings to match each other..
- Figure out where you’d like to place each wing. Mark where each wing wire will go with a pin. Use an awl to make a hole in the body for the wire. Coat the bare end of the wire with E6000 glue and put the wire in the hole. Let it dry.
- Bend the wings and head into position. Do any final trimming and clean up. Lightly fluff the whole body with your awl and you’re done!
Supplies I used for this project
I have included Amazon affiliate links for some of the items below. This means I may earn a small commission (at no extra cost to you) if you click through and make a purchase. Thank you in advance if you decide to support my work using these links. Doing so helps me continue to create content for you!
- 22g Copper or Craft Wire – four 15” pieces and two 4 ½” pieces
- Wire cutters
- Chain Nose Pliers
- Sewing Gauge or Clear Ruler
- Mini Metal File Set or sandpaper
- Sarafina core wool
- Elmer’s Glue-All Multi-purpose Glue
- Large Woolbuddy or Small Woolbuddy
- Felting Needles Set of 36 Star, 38 Star, and 40 Spiral (5 of each) in a metal tin
- Clover Pen Style Needle Holder
- Short Stem Ball Head Pins
- Dritz Air Erasable Marker
- Pale peach merino top for beak
- 6mm Round Black Onyx Beads
- Black All Purpose Thread
- Embroidery scissors
- Beading Needle that will fit through holes in 6mm beads
- Black Merino Combed Top
- Pale Pinkish (not bluish) Gray Merino Top (eyelids)
- DHG Beaver Merino Top
- Light Orange Merino Top (legs)
- Water
- Small container to mix glue and water
- Soft flat paintbrush
- DHG Sarafina Fur Top in Duck Fluff or from DHG
- Thin Awl (included in a beginner needle felting supply kit)
- Mascara Eyelash Comb and Eyebrow Brush
- Plastic food wrap (Saran Wrap, Glad Wrap or any other brand)
- Piece of scrap felt sheet in a light color
- Awl Larger with Wood Handle
- E600 glue
The photos of real chicks in the video were taken by:
- Chick standing on piece of wood by Philipp Kleindienst from Pixabay
- Two chicks on ground by Karim Manjra on Unsplash
- Chick walking by Franck Barske from Pixabay
- Two chicks in grass image by Melanie/Lolame from Pixabay
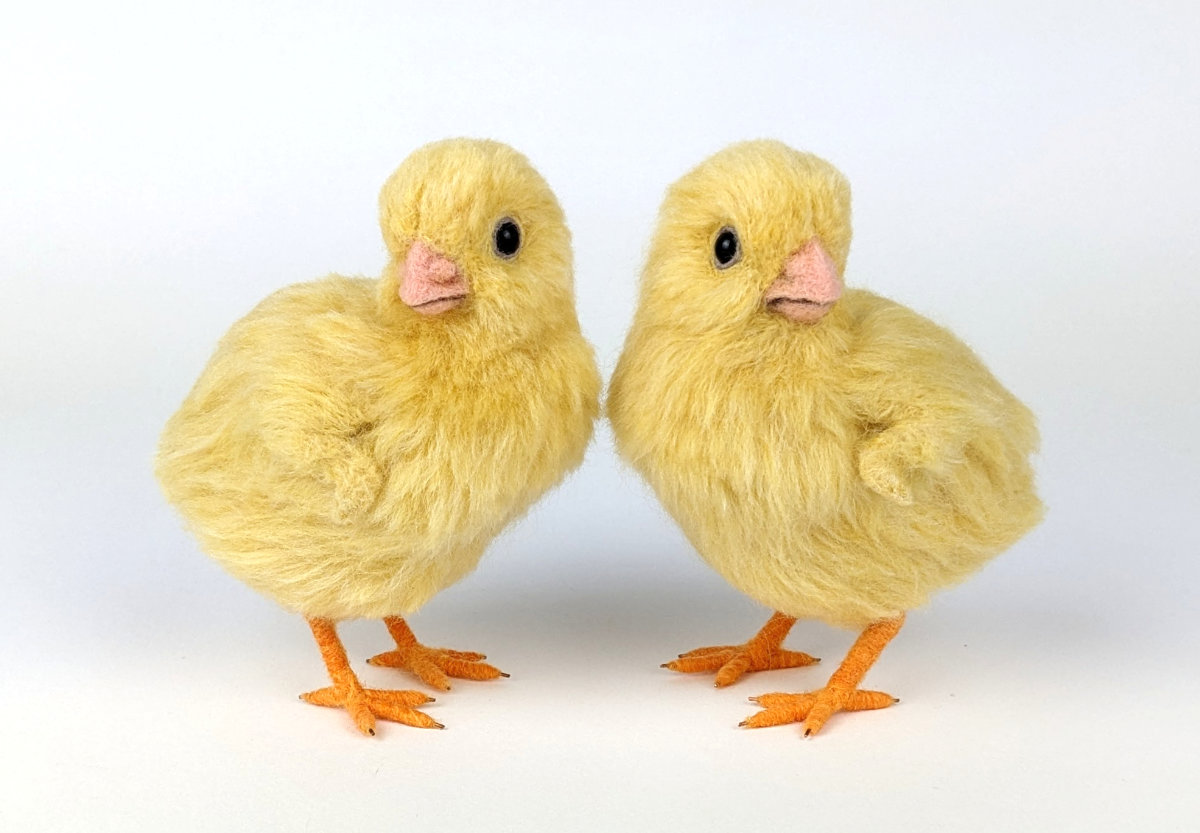
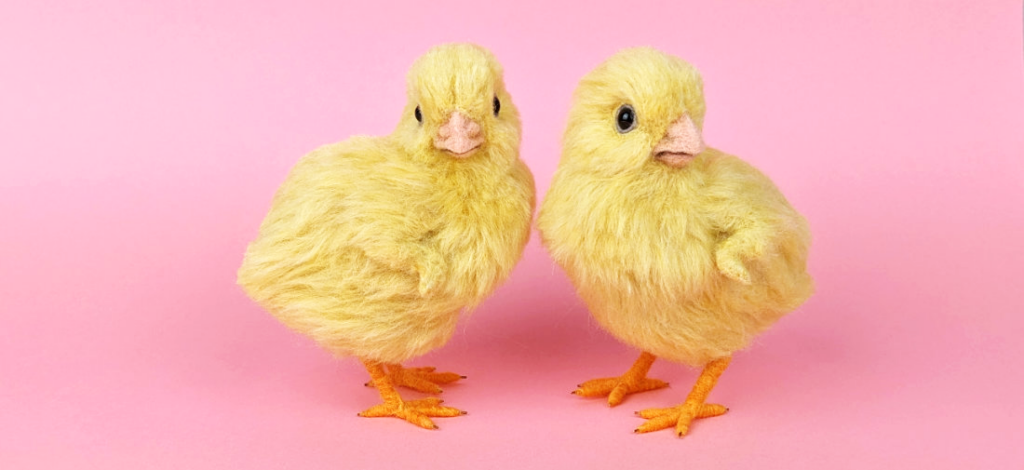
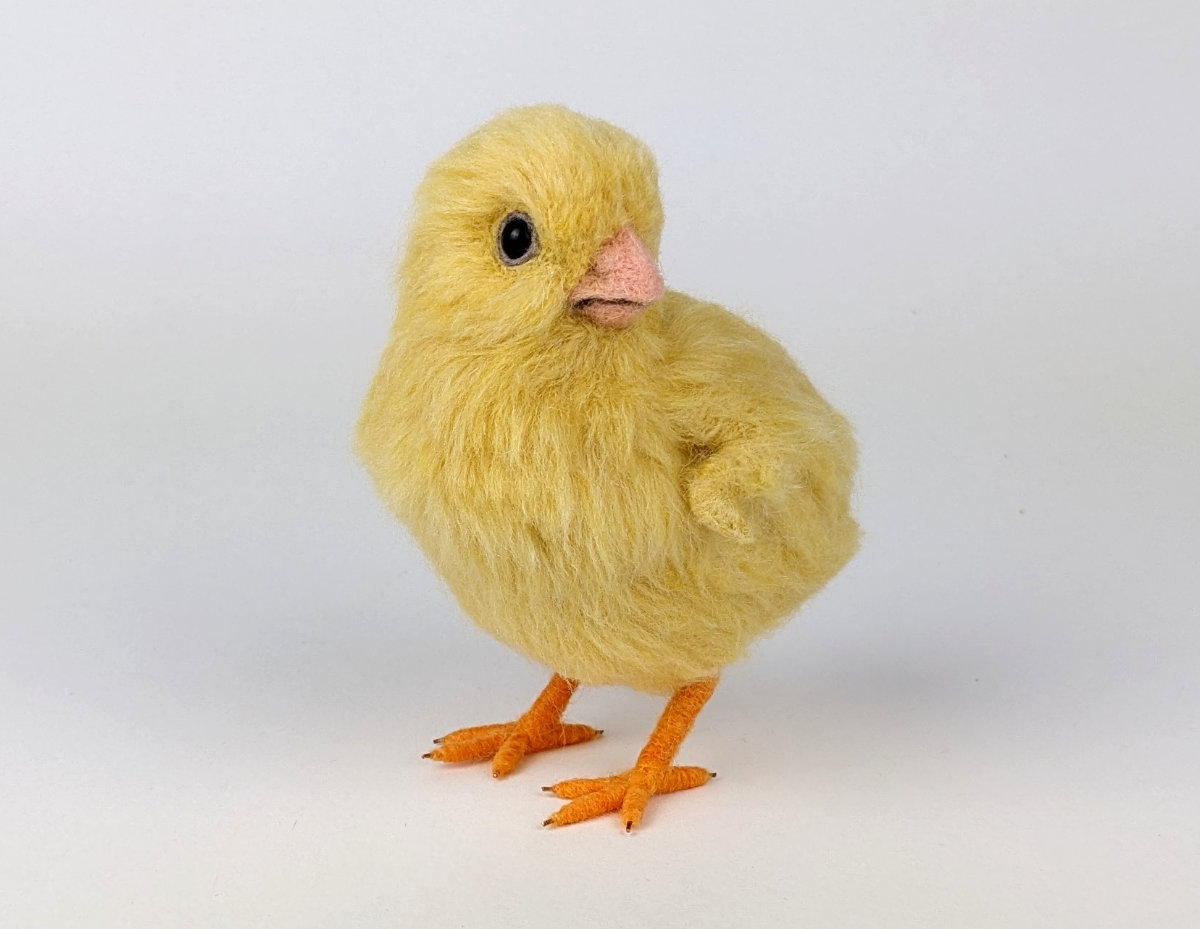
Here’s my finished baby chick!
And here he is with a friend. You can switch the direction of the head to make a super cute pair.