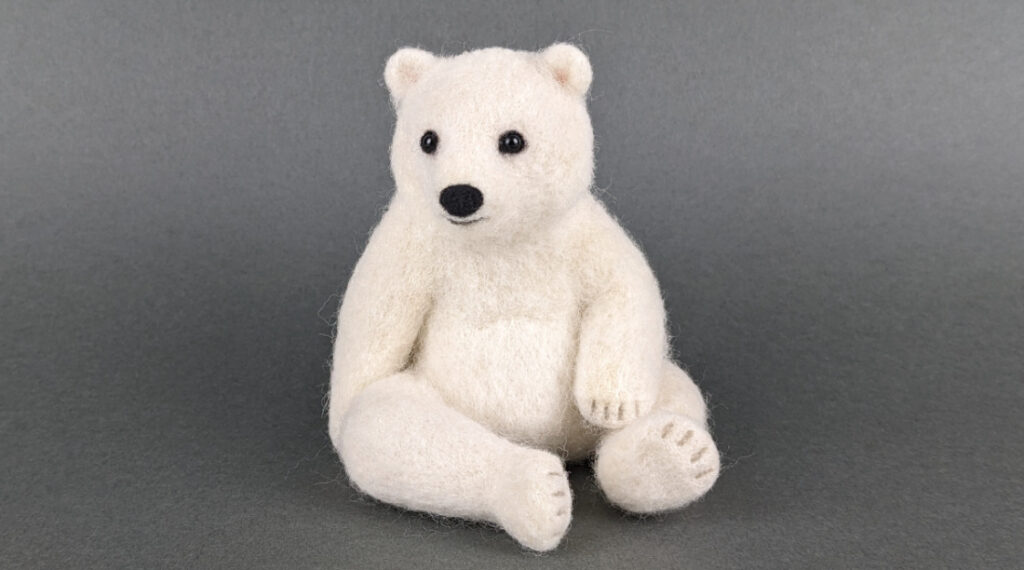
Making a polar bear cub
I started this project by looking at reference photos and making a sketch for my cub. I created a video overview of the process I followed.
I created a free PDF download of the pattern I used if you’d like to grab it.
Tools and supplies used in this project
I have included Amazon affiliate links for some of the items below. This means I may earn a small commission (at no extra cost to you) if you click through and make a purchase. Thank you in advance if you decide to support my work using these links!
- 28” of 14g aluminum wire
- Westcott Clear Flexible Ruler
- Wire cutters
- Chain nose pliers
- Sewing Gauge
- Sharpie marker
- Elmers Glue-All
- Core wool
- Small felting mat
- 38 gauge star felting needle
- 40 gauge twist felting needle
- 4 mm Black Glass Eyes on a wire
- Sarafina White Top
- Dark (Black) DHG carded Merino or another black carded wool
- Shell (Peach) DHG carded Merino or another peach carded wool
- Sand Dollar (Beige) DHG carded Merino or another beige carded wool
Designing the armature
Initially, I tried using 22 gauge cloth wrapped wire. But it was too flimsy. I switched to 14 gauge aluminum wire and cut a 12” and a 16” piece. I bent the 12” wire in half and twisted it 1 ½” down from the fold. I bent the 16” wire in half, placed it over the split on the first wire. Then I twisted the wires on the right side twice and repeated that on the left side to make the shoulders..
Next, I bent the two longest wires back and twisted them to make the spine. Measuring from the base of the cub’s neck to the end of the twist, the back is 2 ¼” long. It was a little too long. I’d go with 2” instead.
I marked the leg and arm measurements on the wire using a Sharpie. I bent each leg forward at 1 ⅝” to make the knees and then bent again at 1 ⅜” to make the ankles. I bent the wire at ½” to make a foot. I folded the remaining wire back down and trimmed it above the ankle to complete the foot.
I bent the arms at 1 ¼” to make the elbows and then again at 1 ⅛” to make the paw. As with the foot, I folded the wire back in toward the body and trimmed it at about ¼”,
Finally, I pinched the loop at the tip of the head wire a little. I bent that forward about ½” from the base of the neck. And then I curved it to form a head shape.
Building up the core wool base
I tore off about an 8” piece of core wool and divided it into ½” strips. I placed white glue on about two inches of wire at a time to help the core wool grab. Then I repeated adding glue and wrapping core wool until the whole armature was covered.
I wrapped more core wool over the arms, legs and body until it was about ½” thick. I tried to be careful not to lose the bends in the spine, elbows, knees and ankles. I added a little more wool to the spine and built that out to about ¾”.
Then I wrapped a small amount of wool around the head to get that started and gave the whole piece a good felting to firm it up.
Next, I tore off a 5” long by 2” wide by approximately ½” thick piece of core wool. I folded it in half and attached it behind the spine to make the bear cub’s back. I tore off small pieces of core wool to build up the limbs, the head and snout.
I also made temporary core wool ears to help me get a feel for the head and place the eyes. I added short florist pins to indicate where the eyes will sit. I added the belly and chest.
Attaching the glass eyes
I decided to use glass eyes for this piece. I had a little bag of 4.5 mm button eyes. Apparently, “button” means they are a little thicker and rounded than regular glass eyes. They aren’t a perfect 4.5 mm. Most of them are close but some are smaller and some larger. I weeded through my little lot of eyes and found two on the smaller side to use.
I felted a slight divot around the pins so the eyes would be set into the head a little. Then I removed a pin and made a deeper hole with my awl. I tested that the eye wire would fit and glued the eye in place. I repeated this for the opposite eye.
Adding the topcoat
For the fur, I used Sarafina White. This wool was a giveaway from a Fiber Fairy Friday a while back. I’m not sure if it is the same mix they sell today. But I imagine it would be close. I noticed the core wool face was going to be too wide with topcoat added. So I trimmed back the core wool on the face. I started covering the head.
Before I removed the placeholder core wool ears, I made new ears out of the Sarafina White. I put just a smidge of DHG Shell Carded Merino inside each ear and attached them. I also added a placeholder nose to help me see how the face was shaping up.

Finishing up the details
I added DHG Dark carded merino to the nose by rolling a small ball of wool, attaching it and repeating that process. I used my awl to help push the wool or pull it where it needed to be. And I checked the nose from different angles.
I tried dotting eyeliner on with a Spectrum Noir Illustrator alcohol marker. I used BG6 Brown Grey. I like it a lot but it needed to be darker. I rolled a tiny rope of Dark DHG carded merino and felted that over the alcohol marker. I think the alcohol marker gives the color a little more depth than the wool alone.
I felted indentations in the paws for the toes. I mixed a pale grayish brown color using Beaver and Sand Dollar DHG carded merino. Finally, I felted thin ropes of this color to the toes to give them a little depth and my Polar Bear Cub is done!
The photo of the real Polar Bears in the video are from this photographer:
Photo of mother polar bear with her cub is by Alan D. Wilson, CC BY-SA 3.0, via Wikimedia Commons


