How do I fix a felting problem?
Here are solutions to a few common problems you may run into when needle felting. If you need to troubleshoot a question that isn’t answered here, send it to me! I’ll try to help.
My piece looks pockmarked
If you see large or unsightly holes in the surface of your piece, you are most likely stabbing the needle in too deep or using a coarse needle. There are a couple of ways to soften or reduce the size of the holes.
First, go over the surface with a fine felting needle. Use shallow pokes, ideally at an angle instead of straight up and down. The angle will help remove the original holes and give you a smoother finish.
If you still have holes, try teasing the edges of the hole very lightly with the tip of a small awl to reposition the fibers. You’re just trying to move the fibers over the hole, not felt them inside it.
If there are remaining small holes, try setting the piece aside for a few days. I’ve found that some wool surfaces, especially fine fibers, seem to relax after a couple days. The holes sometimes disappear given a little time. Or maybe they just don’t bother you as much when you step away and look at it with fresh eyes.
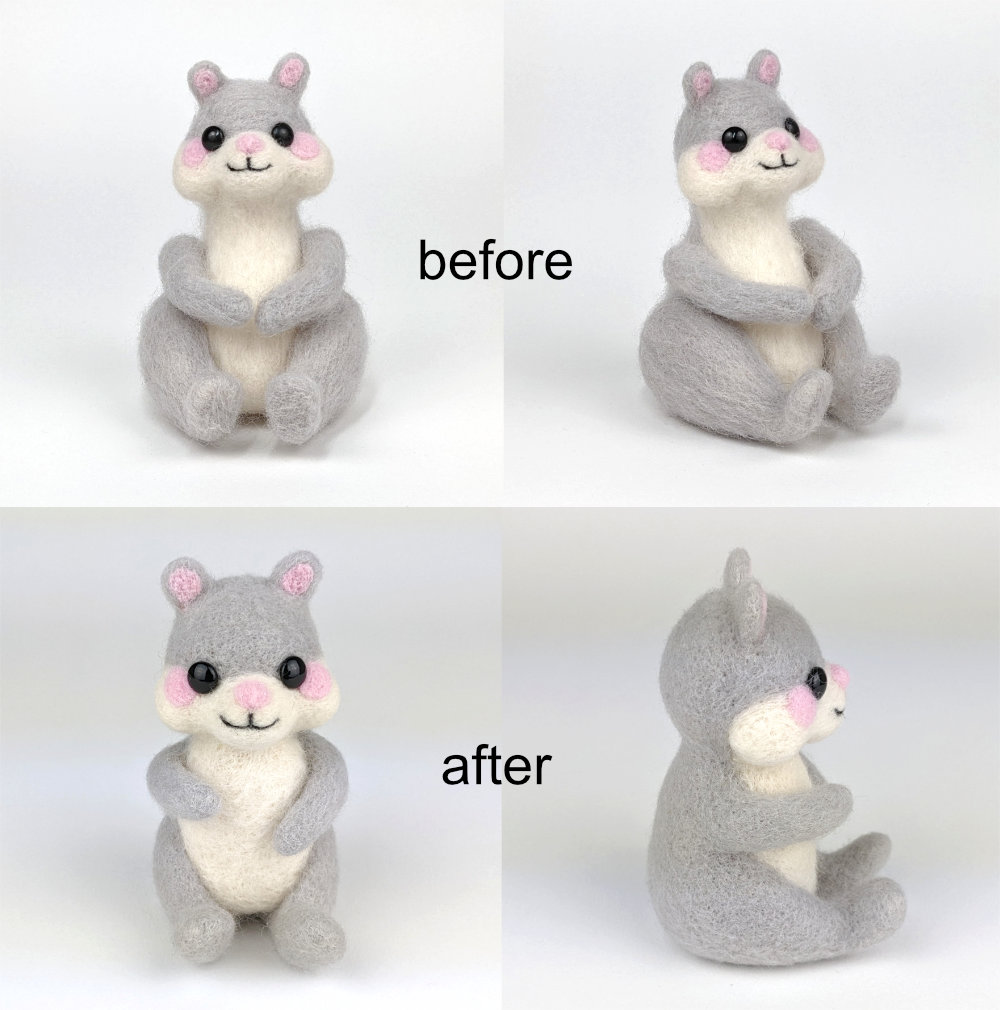
My animal’s head or body part is too big
Cut it off or cut it down. While it may feel painful, there’s no point in continuing to felt something down when it is too large. I’ve cut off feet, hands, limbs, heads, tails, and even done surgery on bodies. Try to save the topcoat if you need it but just hack that core wool down and build a shape that will work.
If your piece has an armature, try not to cut it. Just trim around it and you’ll be able to reuse it.
A insect, pet or human damaged my needle felted piece
Most of the time, you can repair damage. How much work it will take varies depending on the degree of the damage and whether you have the appropriate type of wool in a matching color. Here’s a very good video demonstrating how to repair insect damage to a stunning needle felted horse. While it is unpleasant, it can happen. If a piece is sentimental or precious, this video might help you understand the work that is required for this type of repair.
In my experience, I can repair a lot of damage as long as I have wool that matches or can be mixed to match. You just need to take your time and rebuild what you can with core wool first. Then redo the topcoat with your colored wool.
If your piece looks repaired, taking a photo or looking at the piece in a mirror may help you figure out what needs to be addressed. Sometimes I think a repair is glaringly obvious. But when I look at it through a camera or in a mirror, I realize you can’t see it. Since I know where the repair is, I couldn’t see the bigger picture.
If the piece is beyond repair but still precious, you can also change it. Pretend it was taken to a vet or the hospital and add a few bandages. That can end up being delightful and make an upsetting situation fun again.
The fiber I’m using just won’t felt
Some fibers take a very long time to felt manually. I’m going to assume that you are using washed or scoured wool. If not, take a look at my post explaining the problems you might encounter if you use unwashed wool.
If I really want to use a fiber that is behaving badly, I will blend in a wool in the same or a close color that I know felts well. I will test the blend before I add it to my piece. I aim for a ratio of 3 parts fiber that won’t felt and 1 part fiber I know felts. If it still isn’t felting, I’ll add more of the second fiber. While I understand that you love the look of the original fiber, sometimes you have to sacrifice that a little bit to make it work.
I don’t like the colors or the type of wool I used
Hopefully, you used core wool for the base of your piece and it’s the topcoat that you are unhappy with. This is just one of the reasons you might want to consider buying core wool.
You have two options. You can remove the offending colors or you can add wool on top to cover them. If adding wool on top won’t distort, your piece, that’s generally easier.
I usually prefer to remove the wool. You can loosen it with a small awl and carefully pull it off. This process takes time and patience. But it works well and there’s less damage to repair. If I want to get rid of large areas of the surface, I use a seam ripper. It gives you control over how deep you go and it zips the wool right off.
Once I have the original color off, I’ll add a thin layer of core wool to give me a fresh base. This isn’t necessary for darker colors but it helps tremendously if you’re going to add white or a lighter color on your new surface.
Something’s wrong but I can’t figure out what it is
If your piece feels off, look at it in a mirror or upside down. Taking a photo of it is another way to get a little distance so you can be more objective. If those don’t work, put it away for at least a day or two. Sometimes mistakes or weirdness are easier to spot when you look at your piece with fresh eyes.
——————–
I have included Amazon affiliate links for some of the items above. This means I may earn a small commission (at no extra cost to you) if you click through and make a purchase. Thank you in advance if you decide to support my work using these links. Doing so helps me continue to create content for you!


