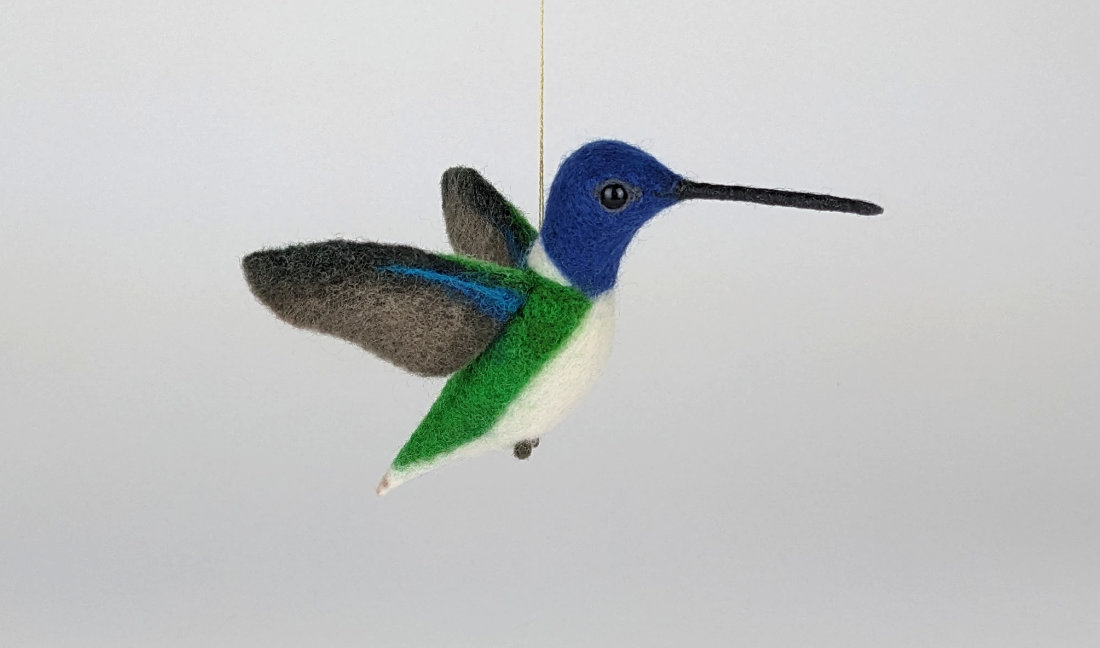
Just in time for Spring! Hummingbird video tutorial and free PDF pattern

I created a step by step video of my process for making a needle felted hummingbird. In it, I show you how to create a male Ruby-throated Hummingbird ornament.
If you’d like to felt along, download my free PDF pattern. You’ll see me use it in the video below!
If you’d prefer to purchase a completed needle felted hummingbird, check out my Etsy shop. The two that I made while creating this tutorial are available for adoption.
Step by step instructions
- Download and print the free hummingbird PDF pattern on an 8 1/2″ x 11″ piece of paper.
- Armature wire types and lengths: One 5-6″ long 22g cloth wrapped wire (I used brown) and two 4″ long 32g cloth wrapped wires. Glue both ends of 22g wire and at least one end of each 32g wing wire to prevent the cloth/thread from unwrapping.
- If your beak wire is white, use an alcohol based marker (e.g., a Sharpie) to tint about 2″ of the wire a darker color. If you’re making a black beak, use a black marker. This will prevent the white cloth or thread from showing through your black beak wool.
- Wrap the beak tightly with a very thin strip of black merino top. Use a soft paint brush to coat the beak with a 50/50 mix of glue and water. Let it dry.
- Felt the bird body and head with core wool
- Use short ball headed pins to determine eye placement. Make a hole using an awl. Glue the eyes to the head using E6000.
- Draw pattern for top coat colors on the core wool bird using an air erase marker.
- Add a thin layer of top coat to color in each section. Once you are happy with the shapes and placement of the colors, add a second layer of top coat.
- Felt a tiny tail and attach it to the base of the bird’s body.
- Print or trace the wing pattern on a piece of cardstock. Cut out the wing pattern.
- Bend the wing wire about 1” from the glued end.
- Felt a thin sheet of wool around the wire for each wing. Use the cardstock cut out as a guide to refine the shape and edges.
- Add wing detail color.
- Use short ball headed pins to determine wing placement. Make a hole using an awl. Glue the wings to the body using E6000.
- Create tiny feet using brown wool. Pin the feet on the body to determine placement. Felt the feet to the body.
- Cut a length of gold thread at least 12-14” long to make a hanger. Use a doll needle to determine the placement and angle of the hanger. Set the thread through the bird’s body. Knot the end of the thread. Poke a small divot in the body under the knot. Pull the knot tight to the body. Cover the knot by felting a little wool over it.
- Add any final details. Lightly felt the whole body with a fine needle to smooth the surface and you’re done!
Supplies I used for this project
I have included Amazon affiliate links for some of the items below. This means I may earn a small commission (at no extra cost to you) if you click through and make a purchase. Thank you in advance if you decide to support my work using these links. Doing so helps me continue to create content for you!
- 22g cloth covered wire – I used brown 1 – 6” piece
- 32g cloth covered wire, 2 – 4” pieces
- Clear Ruler or Sewing Gauge
- Elmer’s Glue-All Multi-purpose Glue
- Water
- Small container to mix glue and water
- Soft Flat Paintbrush Set
- Small Woolbuddy
- Felting Needles Set of 36 Star, 38 Star, and 40 Spiral (5 of each) in a metal tin
- Sarafina core wool
- Black merino combed top
- Black DHG Carded Extra Fine Merino
- White DHG Carded Extra Fine Merino
- Sage Carded Maori Wool
- Kiwi/Caipirinha DHG Carded Extra Fine Merino
- Moss Green Carded Merion (purchased from Big Sky but not currently available)
- Forest Green Carded Merino (purchased from Big Sky but not currently available)
- Red + Orange DHG Carded Extra Fine Merino
- Acacia or White Peach DHG Carded Extra Fine Merino
- Cafe au Lait Merino Top (purchased from Sarafina but not currently available)
- DHG Beaver Merino Top
- Piece of scrap felt sheet in a light color
- Short Stem Ball Head Pins
- Dritz Air Erasable Marker
- 5mm glass eyes
- Wire cutters
- Awl Larger with Wood Handle
- E600 glue
- Embroidery scissors
- DMC Gold Metallic Embroidery Thread
- Doll needle or other long needle
The photo of a real hummingbird in the video was taken by:
- Ruby-throated Hummingbird on a post by Keith Martin on Unsplash
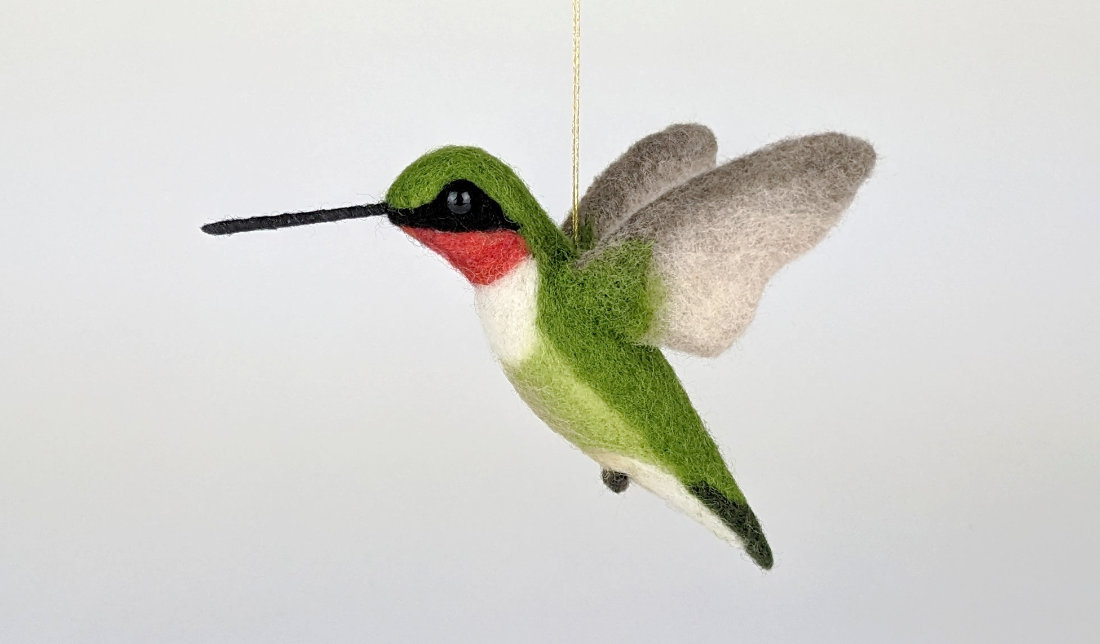
Here’s my finished Ruby-throated Hummingbird ornament
And my completed White Necked Jacobin Hummingbird ornament