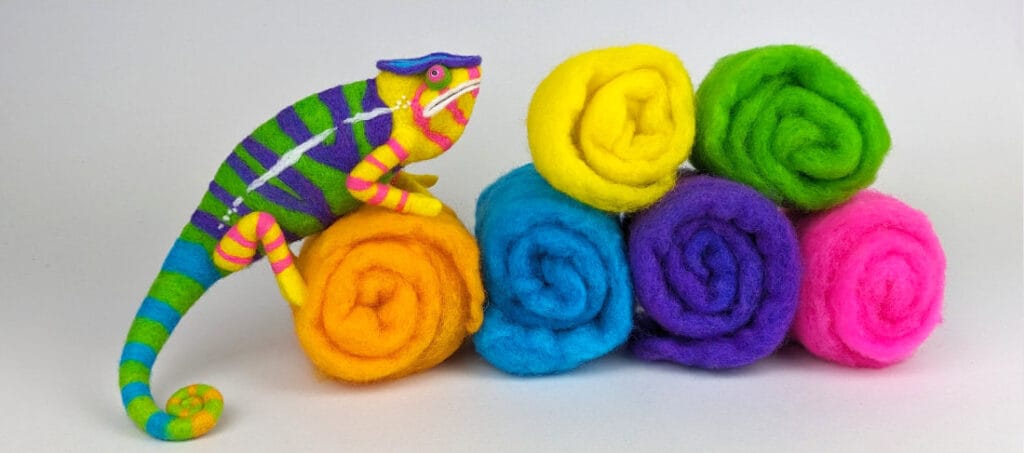
Dyeing wool with an Easter egg decorating kit to make a chameleon
I want to learn to dye small batches of wool. I was inspired by Rebecca from the Chemknits YouTube Channel to step into dyeing by using some form of food coloring.
She has several videos on dyeing yarn with KoolAid, candy, food coloring, and Easter Egg Dye kits. I chose the Easter Egg Dye and purchased a PAAS Neon Kit for $2.76 at my local Walmart. The Neon kit has 6 dye tablets.
I created a video to share the process I followed to dye the wool and make a Panther Chameleon. I included the tools, supplies, and steps I followed to do both below this video.
You can also download the free PDF pattern I used in this video.
If you’d prefer to purchase the completed needle felted chameleon, hop over to my Etsy shop. This striking sculpture is available for adoption.
Tools and supplies used in this project
I have included Amazon affiliate links for some of the items below. This means I may earn a small commission (at no extra cost to you) if you click through and make a purchase. Thank you in advance if you decide to support my work using these links. Doing so helps me continue to create content for you!
Tools
- Rubbermaid Takealongs plastic containers with lids
- Plastic boot tray or something to protect your work surface from spills or spatters that might discolor it
- 2 custom etched pint glasses (I chose the compass and the swallow)
- 1 tablespoon measuring spoon
- 1 cup measuring cup
- Plastic teaspoons for stirring
- OXO good grips folding sweater drying rack
- Hand Dyeing Yarn and Fleece book by Gail Callahan
- Small spray bottle (travel size)
- 38g star felting needle
- 40g twist felting needle
Supplies
- Easter egg eye tablet kit (in the US, will cost less at your local grocery store) – PAAS Neon 6 tablet or PAAS Deluxe 9 tablet
- White vinegar (1 tablespoon per tablet)
- Water (1 cup per tablet)
- Unicorn Power Scour
- Sarafina White wool roving (I used about .33 ounce per tablet)
- Paper towels
- Cloth wrapped 32g wire
- Cloth wrapped 22g wire
- Elmer’s Glue-All Multi-purpose Glue
- Amazon Basics Premium Colored Pencils, Soft Core, 24 Count
- Core wool
- Water for the spray bottle
- Powdered Sugar Felter’s Palette wool batting
- 4mm clear glass eyes
- Kleancolor metallic nail polish
- A pinch of Beaver Short Fiber Merino Batt
Here are the steps I followed to dye the wool
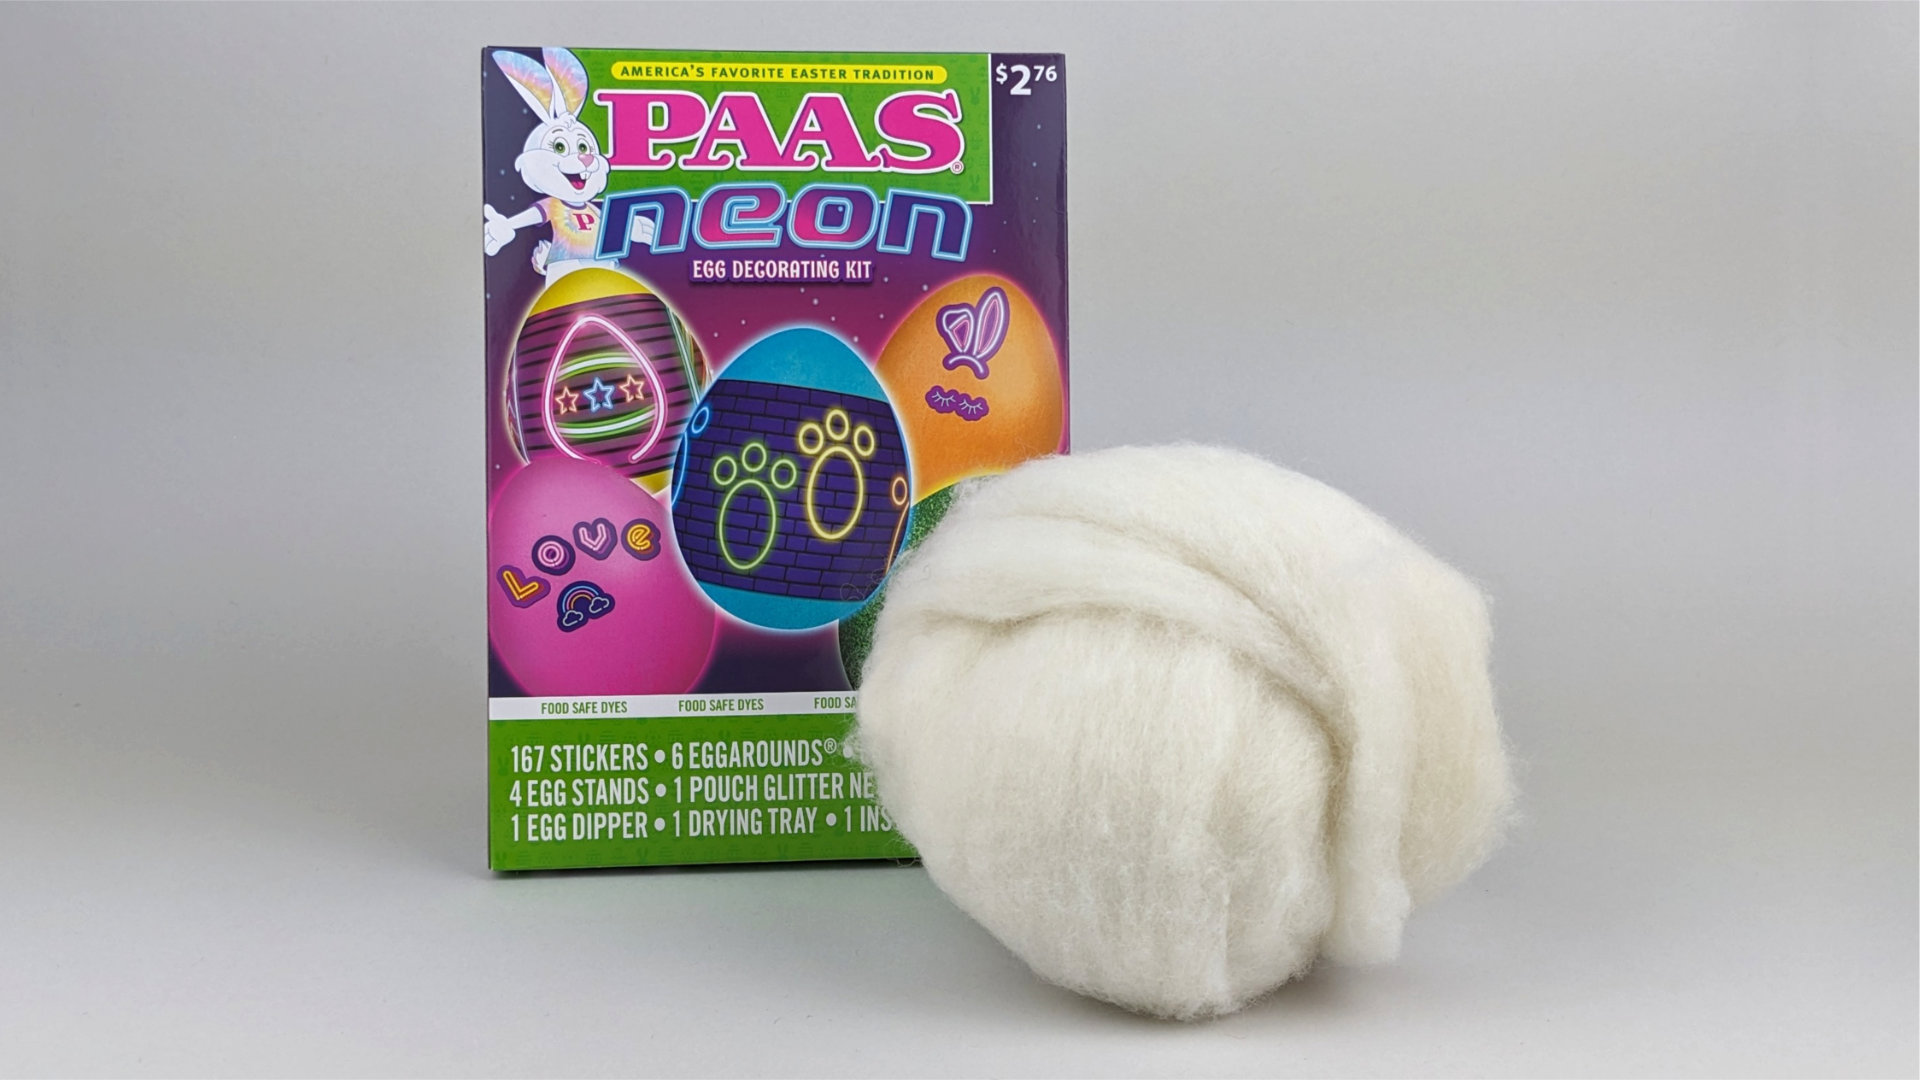
- Presoak the wool by placing it in roughly room temperature tap water for approximately 3 hours. I used six covered, plastic containers, one for each color. And I added about ⅓ ounce of Sarafina White wool roving per container.
- Dissolve each dye tablet in a tablespoon of white vinegar. I did this in a glass so the mix would not stain my plastic containers. vinegar and tablet in a glass first. Give the tablets about 5 five minutes to dissolve.
- Add 1 ⅓ cups of water to each dye tablet and vinegar. Pour this in a plastic container.
- Lightly wring out the wool and place it in the dye.
- Cover the container and set it aside for 24 hours.
- Check the containers. Add half a tablespoon of white vinegar to each container.
- Loosely cover the containers so they are vented. Place two in the microwave and heat them on High for 2 minutes. Microwaves vary so check the wool to see if is it steaming hot. Mine was not so I microwaved the containers another 2 minutes.
- Let them cool a little, cover them tightly, and set them aside for about 8 hours.
- I repeated the heating process again and let them sit overnight.
- Check the containers. The water was clear (meaning the dye was absorbed) in all the containers except the blue and purple. There was just a hint of blue in their water. I decided that was ok.
Steam set the wool by squeezing the water out. You still want the wool damp. - Put the wool back in the containers with the top vented and microwave each color 2 minutes on High.
- Let them sit for a minute or two. Then microwave them for another minute on High.
- Set them aside with their top vented to cool for a few hours.
- Gently rinse the wool in a bowl of tap water. I did the light and dark colors separately to prevent any accidental color transfer.
- Mix half a tablespoon of Unicorn Power Scour with a gallon of room temperature water. Soak the wool in this solution for 15 minutes. Again, I did the light and dark colors separately.
- Rinse the wool again.
- Gently squeeze out any remaining water from the wool and spread it out to dry on a sweater drying rack.
- I let the wool dry for 3 days. It was probably dry on the second day but I figured it wouldn’t hurt to give it an extra day.
Designing the chameleon
I wanted to make something that would allow me to use all six neon colors. I chose to make a Panther Chameleon because they have such gorgeous coloring and it varies. My six dyed neon colors won’t necessarily be realistic but I think they’ll work for a needle felted version.
To get started, I made a pattern. You can download this as a free PDF pattern. Before I started making the chameleon, I needed to figure out where I would place the six neon colors. I printed my pattern and filled it in with colored pencil. It was like doing a coloring page.
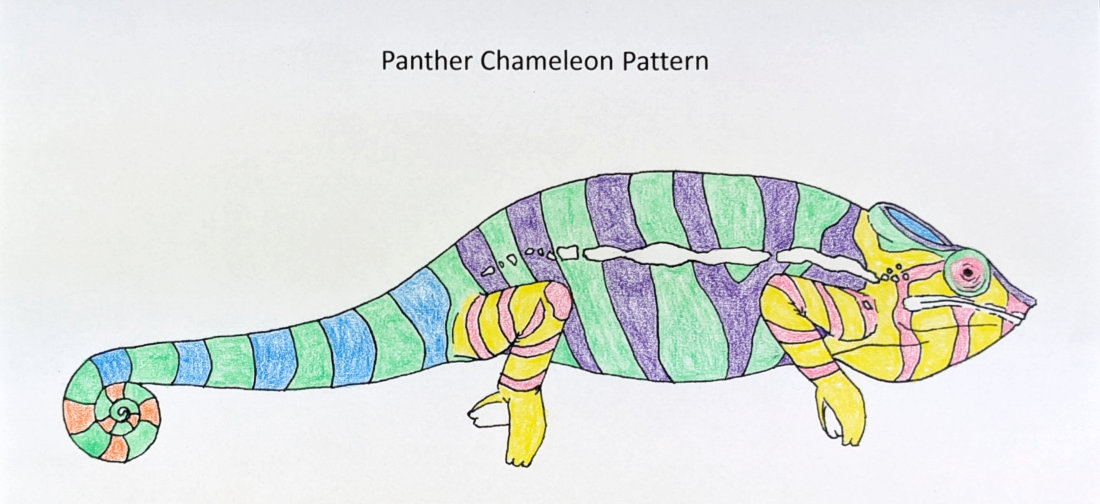
The only problem was I ended up doing this eight times before I came up with a version I loved. The color makes this more a fantasy chameleon instead of a true Panther. But I spent the time to dye this wool so I’m using all six of the colors on this chameleon.
The armature
- For the feet, I cut 4 – 6” pieces of 32g cloth wrapped wire.
- Bend each wire in half. About ⅝” down, bend the wire out at a 90 degree angle
- Separate the two ends. Bend one side at approximately ⅛” (for 2 toes) and the other side at about 3/16” (for 3 toes)
- Finally, bend each side up at ⅝”. This gives you two toe loops for each side of the foot.
- I cut 4 – 3 ½” pieces of 22g cloth wrapped wire for the legs. I attach each foot to a leg by wrapping the two ends of the foot wire up the leg.
- For the tail, I cut 1 – 9” piece of 22g cloth wrapped wire
- And for the body, I cut an 11” piece of 22g wire. Fold the body wire in half and loosely twist it to give it some extra strength.
Building the core
- I added a little glue to the tail wire and wrapped about 6 ¾” of the tail in the light green. I built up layers, felting them in place until they matched the pattern.
- I rolled the tail between my hands. I also misted the tail with water and rolled it some more to help it felt. The tail surface needs to be somewhat firm to be ready to receive the stripes. Otherwise, they will just sink into the surface instead of staying on top.
- I worried that I did not have enough yellow to make the four legs and the head. Luckily, I had some yellow merino combed top in my stash. I built the legs with that instead of core wool. I didn’t want white core wool poking through the legs or feet when I added yellow on top.
- I build the feet up with small pieces of wool. I try to make the wool a flat ribbon and wrap each side of the foot, felting the wool as I go. Keep the feet thin as we’ll add the neon yellow color when we do the top coat.
- After building up the feet, make the bends for the knees.
- Build the body in core wool. Look at reference photos. Chameleon bodies have narrow hips, a wide belly and ribs, and narrow again at the shoulder. The head is kind of wedge shaped. It is narrower at the nose and widest just behind the eyes.
Adding stripes to the tail and legs
- I added the orange and blue stripes to the tail.
- After the stripes were attached, I rolled the tail between my palm and finger. If needed, I felted it a little more with a 40 gauge needle.
- Then I misted the tail with water and rolled it. This helped the orange stripes level out with the green and gave the tail a smooth finish.
- I did the same for the blue stripes.
- I thought I should wait to add the last blue stripe. It would be the one closest to the body. I might need to adjust the width or position of the strip after the tail and legs are attached to the body.
- I added neon yellow wool over the yellow merino on the legs. As with the tail, the surface needs to be fairly firm before you attach the stripes.
- Once it was, I added on the neon pink stripes.
- I did my best to mirror the strips from the opposite leg. The body will be between them so they don’t have to be perfect. But they should look related.
- I smoothed the legs by misting them with water and rolling them between my fingers or on my palm. You want to apply some pressure as you do this.
The body and head
- I covered the body in neon green wool and started covering the neck in neon yellow.
- I rolled and felted two small spheres of core wool, one for each eye. I used pins to figure out their placement and attached them to the head.
- Then I rolled a loose cylinder of core wool to build up the top lip.
- I felted a thin sheet of blue core wool in sort of a shovel shape to start making the crest on the top of the head.
- I painted the back of a set of clear, 4mm glass eyes with a metallic pinkish lavender nail polish and set them aside to dry.
- I began covering the head in neon yellow wool.
- I added white over the top lip. I rolled a white cylinder for the bottom lip and attached it.
- A tiny rope of brown wool felted in between the two lips help to define that lip line.
- I added yellow to the top of the head and I attached the glass eyes with E6000 glue.
Head details
- I added a layer of neon pink wool around the eyes. I felted that smooth and tight around the glass eyes using a 40g needle.
- Then I added a layer of green wool around the base of the eye ball and a little more than half way up the sides. I felted that smooth also.
- I also created the flap of skin underneath the head and down the neck with neon yellow wool.
- I added a tiny rope of purple to the edge and center of the blue crest piece.
Putting the chameleon together
- I attached the tail by poking a hole in the body, adding E6000 glue to the wire, and inserting it in the chameleon’s body.
- I tested adding the legs by poking a hole for their wire to check their position. Then I glued the legs in place with E6000 glue.
- Then I added the final blue stripe, some yellow wool to the shoulders, and the final pink stripes.
To finish up, I just needed to add the purple stripes and the white stripe along the side of the chameleon’s body.
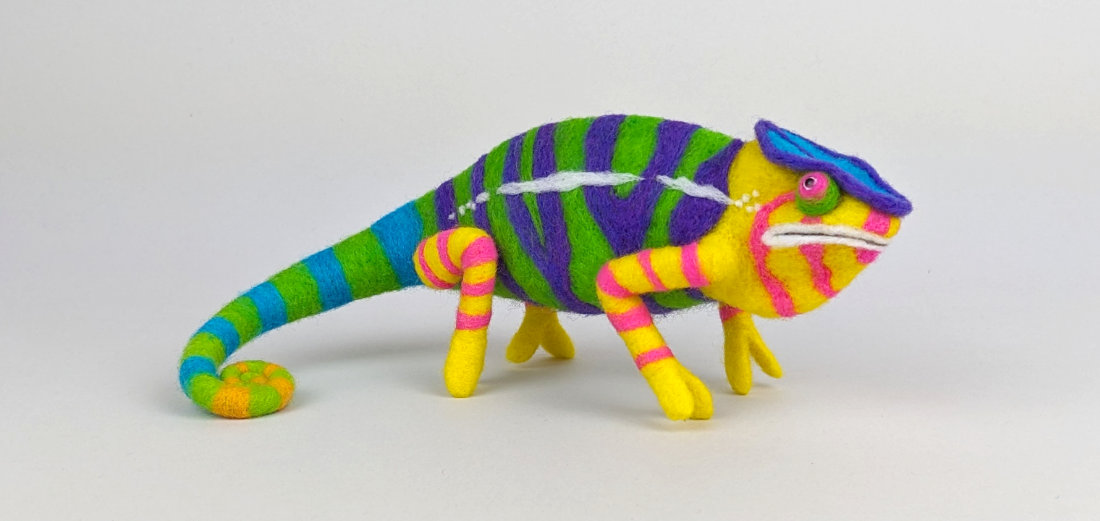
The completed chameleon
And here is what I ended up with! This chameleon is not only brightly colored but also semi-poseable. It was a joy to make.
This project was so much fun and I learned how to dye small batches of wool. I’m inspired to try other dyeing methods and animals!
The photos in the video are from the following photographers
- Portrait of Panther Chameleon looking up by kuhnmi, CC BY 2.0, via Wikimedia Commons
- Red and green Panther Chameleon walking on leaves by steffen (fRedi); andreas (andi.vs.zf), CC BY 2.0, via Wikimedia Commons
- Liquid food coloring in glass containers by Skoot13, CC BY-SA 3.0, via Wikimedia Commons
- Feet of a green Panther Chameleon on a branch by Charles J. Sharp, CC BY-SA 4.0, via Wikimedia Commons


.jpg)
_male_Nosy_Be.jpg)


