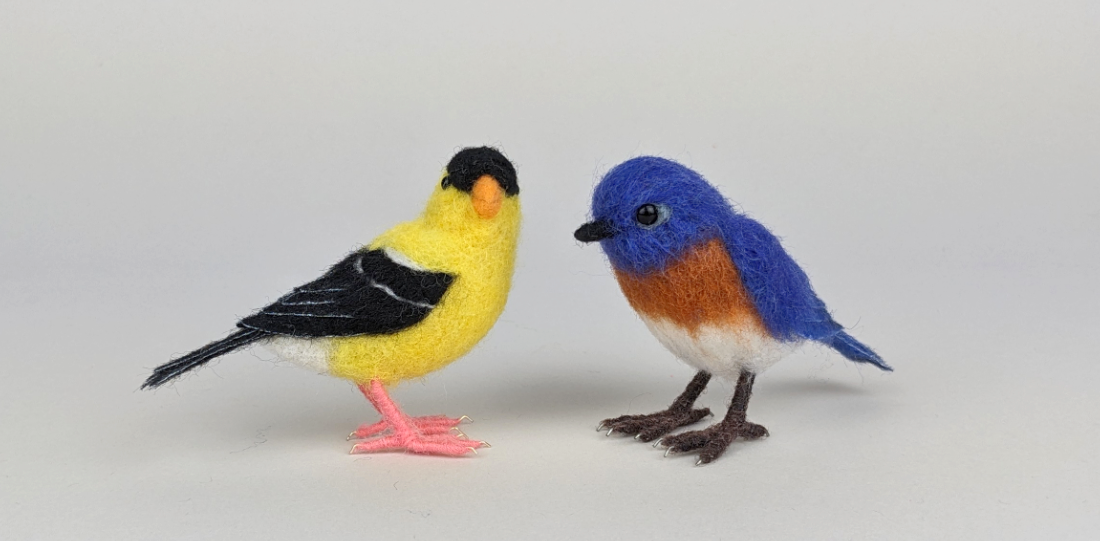
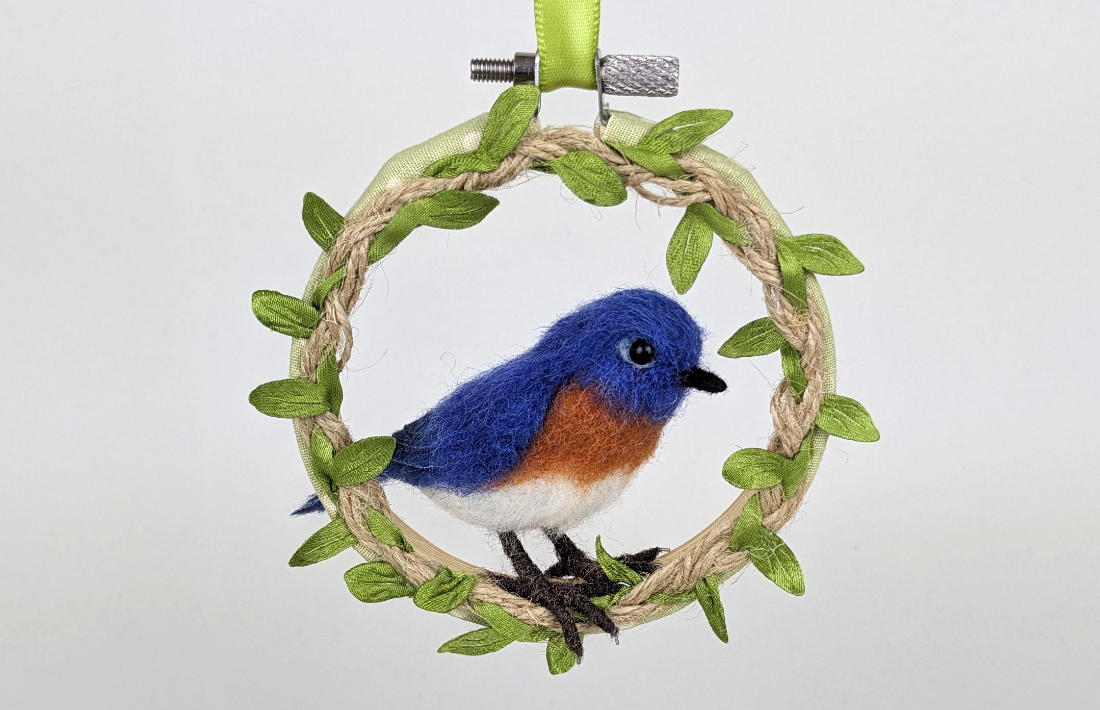
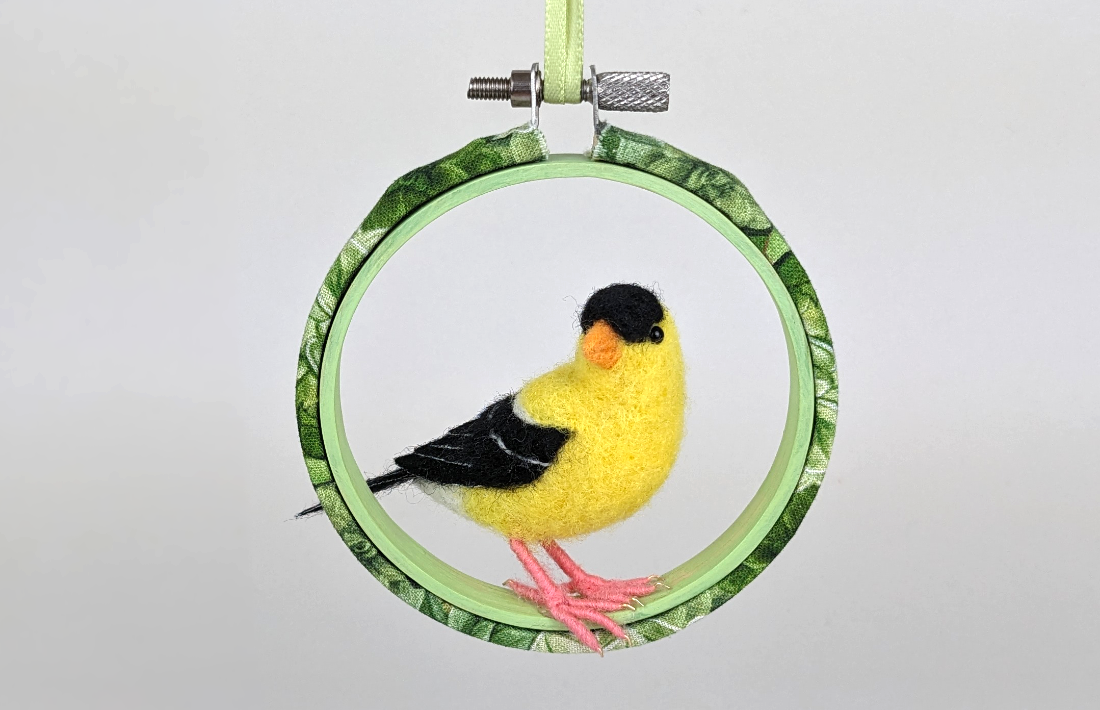
I have a couple 3” embroidery hoops in my stash that I wanted to make something for. I also want to try Eleanor Hunt’s technique for making feathers with wool and fusible webbing (I embedded her videos below). The result is this project to make a mini bluebird sitting in a personalized hoop. I loved it so much, I also made a goldfinch!
I created a free pattern for you to download: Tiny Bluebird Printable PDF Pattern
And I made a full video tutorial. Tools, supplies and step-by-step instructions are listed below.
If you’d prefer to purchase a completed needle felted tiny bird in a hoop, check out my Etsy shop. The two that I made while creating this tutorial are available for adoption.
Tools and supplies used in this project
I have included Amazon affiliate links for some of the items below. This means I may earn a small commission (at no extra cost to you) if you click through and make a purchase. Thank you in advance if you decide to support my work using these links. Doing so helps me continue to create content for you!
Tools
- Wire cutters
- Chain nose pliers with a narrow tip
- Sewing gauge
- Small metal file from set
- Wool buddy small
- 38 gauge star felting needle
- 40 gauge twist felting needle
- Large Awl with wood handle
- Small awl from needle felting starter kit
- Short stem ball head pins
- Embroidery Scissors
- All Purpose Scissors to cut paper
- Iron
- Ironing mat or board
- Pressing cloth or piece of cotton fabric
- Spray bottle with water
- 1” Hair straightener
- Silicone trivet for hair straightener
- Hot Glue Gun and Mini Glue Sticks
- Eyeshadow brush from EcoTools brush set
- Small paintbrush (if coating legs with 50% glue/50% water mix)
- Dust brush
Supplies
- 24 gauge craft wire (silver tone for Bluebird, gold tone for Goldfinch)
- Core wool
- Felter’s Palette Brown Bear (Bluebird)
- Felter’s Palette Bluebird (Bluebird)
- Felter’s Palette Powdered Sugar (Bluebird & Goldfinch)
- Felter’s Palette Pumpkin Pie (Bluebird)
- Small amount of pale blue gray wool (Bluebird)
- DHG Dark/Black Merino Combed Top (Bluebird)
- Felter’s Palette Goldfinch (Goldfinch)
- Felter’s Palette Coal (Goldfinch)
- Felter’s Palette Tangerine (Goldfinch)
- DHG Coral Merino Combed Top (Goldfinch)
- 4 mm black glass eyes (Bluebird)
- 3mm black glass eyes (Goldfinch)
- Air erase marker
- Stitch Witchery ⅝” Fusible Bonding Web (Iron on hem tape) Super weight
- Black Chalk pastel from set
- Pen-touch 1.0 mm Opaque White Permanent Paint Marker
- 3” wooden embroidery hoop
- Sandpaper
- 1 ⅛” x 10 ¾” strip of cotton fabric
- Jute braided trim with green ribbon leaves
- 8-10” strip of ¼” wide ribbon (or piece of jute, baker’s twine, raffia, yarn, etc.)
- E6000 glue
- Mini Glue Sticks and Hot Glue Gun
- Elmer’s Glue-all
- Alene’s Original Tacky Glue
- Wooden toothpicks
- Folk Art Matte Acrylic Paint (cream for Bluebird, light green for Goldfinch)
- Paper towels
Step-by-step instructions for making the bird
Construct and wrap wool around the bird’s feet
- Cut four 5″ pieces of 24g wire and fold them in half. Separate the wires into two groups of two and twist them down about 1 1/2″ from the fold. Bend three toes forward and one back. Then place the wire foot over the drawing in the pattern and trim the toes to match. File or sand the ends of each toe to remove any sharp edges.
- To create the claws, use chain nose pliers to bend each toe up approximately 45 degrees 1/8” from the end of the wire. Bend each claw back down 1/16” from the tip to create a curve.
- Tear off a 2-3” thin strip of carded wool or combed top (combed top is easier!) to cover the foot. Apply a small amount of craft glue to the first toe but don’t coat the claw. You want the claw to remain bare wire. Wrap the wool down the toe, stopping at the base of the claw. Turn the wool and wrap it back up the ankle. Repeat to cover the remaining toes.
- Wrap the wool up the leg about 3/4″ from the ankle. Repeat to thicken the leg if needed. Bend the leg forward about 1/2″ up from the ankle to create the joint at the back of the bird’s leg. Repeat to make a second leg and set both legs aside to dry.
Build the core wool body
- Tear off a 4″ x 2-3″ piece of core wool and roll it into a crescent shape slightly smaller than the pattern. Felt the body using a medium needle. Keep the head round and narrower than the chest and belly area. Make the end of the body thinner and more pointed to support the tail feathers.
- Continue felting the body to refine the shape and firm it up. If you need to, add more core wool to plump up the body. The final felted body should be a little smaller than the pattern. This allows room to add the feathers and top coat.
Attaching the legs
- Mark the spots for the legs with a ball head pin or a marker.
- Trim the top off a leg and pinch the remaining wire together to make a peg. Repeat on the second leg.
- Remove a pin and make a hole for the first leg using your awl.
- Apply E6000 glue to the top of the leg and insert it in the hole. Do the same for the remaining leg.
- Adjust the position of the legs if needed and set the bird aside to dry.
Making the feathers with iron-on hem tape
As I mentioned earlier, I followed Eleanor Hunt’s Realistic Wool Feathers video tutorial to make my tiny bird feathers.. I decided not to include wire in these feathers as they were so small and would not need that extra support. Elanor has two videos, both are informative and easy to follow.
Method One using Wundaweb hem tape
Method Two using a sheet of HeatnBond
- I was not able to find Wundaweb locally so I used 5/8” wide Stitch Witchery for this project. Cut approximately 2” lengths of hem tape.
- Using an ironing mat or board, play a pressing cloth or similar piece of fabric over the ironing surface.
- Pull off a thin layer of wool slightly larger than the hem tape. Place a piece of hem tape over the wool. Add a second thin layer of wool over the hem tape to create a wool sandwich.
- Fold the pressing cloth over the wool, spray it with water to dampen the cloth and iron the layers together. Let them cool for a few minutes, flip the ironed wool over and iron it again on the opposite side.
- To further thin the feathers, run them through a hair straightener.
- Carefully remove any excess wool that is not attached to the webbing.
Cutting out and adding details to the feathers
- If you haven’t printed the pattern, you may want to now. Cut out the feathers from the paper pattern.
- Place a feather over the fused wool. You want to leave some wool at the top of each feather fluffy to give you wool to felt into the bird’s body. Cut out one of each tail feather pattern and two of each wing feather. Cut the first set of wing feathers out with the pattern facing up. Flip the pattern over and cut the second set of wing feathers out. The wings will mirror each other when the feathers are attached.
- Use a soft eyeshadow brush to gently add black chalk pastel to the tips of the feathers. You only need to paint the chalk on the front side of most of the feathers. Add the chalk to the front and back of the largest tail feather as the back side will be visible when the bird is finished.
- Use a white paint marker to outline the straight, cut edges of each feather (not the fluffy tops). Carefully run the edge of the feather along the side of the paint marker tip.
The beak and eyes
- Use a wooden toothpick to create the beak, wrapping a thin strip of black wool around the tip. Remove the beak from the toothpick and felt it with a fine needle.
- Cut a 1”-1 ½” piece of 24g wire. Poke a hole in the middle of the beak using your awl. Add E6000 glue to the tip of the wire and insert it in the beak. Let it dry.
- Use a ball head pin or marker to indicate the position of the beak on the head. Poke a hole using your awl for the beak. Trim back the beak wire, add E6000 glue to it, and insert the beak in the head.
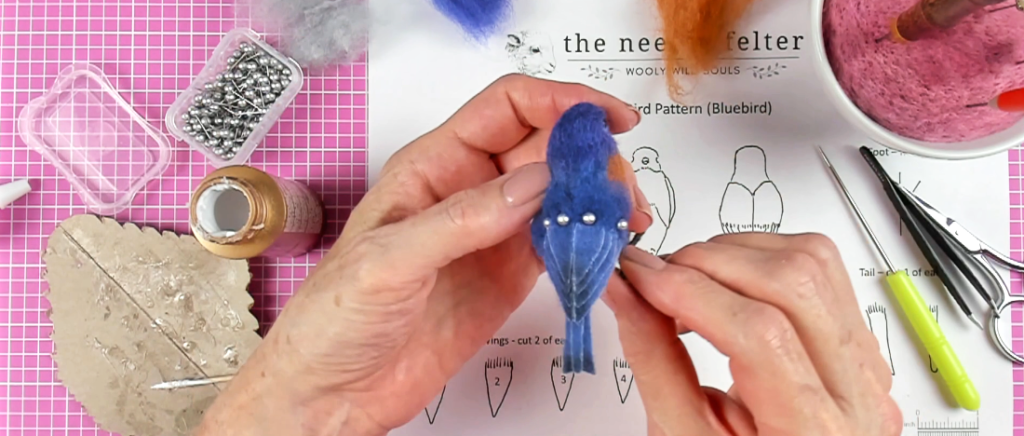
- Mark the position of the eye on each side of the head. Trim back the wires on a pair of 4mm black glass eyes. Poke a hole for an eye using your awl, add E6000 glue to the eye wire, and insert the eye in the head. Repeat to attach the second eye to the head.
Add top coat to the head and body
- Use the shingle or fur technique to add small bits of blue wool to the head, building up the shape and adding texture. Trimming the wool as you go makes it easier to keep track of the shape..
- Needle felt a thin strip of light gray wool around the back corner and under the bottom of each eye.
- Use the shingle of fur technique to add rusty brown wool to the chest and white wool to the belly.
- I felted a coat of blue wool over the back to cover the core wool prior to attaching the wings. I thought it would help keep any white core from peeking through.
Attach the tail and wing feathers
- Stack the tail feathers. Using a toothpick, apply a thin layer of glue to the back of the smaller feather and attach them together. Repeat this process to glue the wing feathers together. Try to make the two wings symmetrical.
- Pin the tail in place and felt the fluffy wool at the top. Remove the pins and glue the top edge of the back of the tail to the body. Felt any remaining fluffy blue feather wool to the body.
- Pin the wings in place. Felt the top of the fluffy wool to the body. Lift the wings and apply glue to the inner half of each wing. Align the wings, press them in place and hold them a few seconds to help the glue adhere to the body. Felt any remaining blue fluffy wool around the wings down to help secure them to the body. Set the bird aside to dry.
Finishing the bird
- Add more blue wool to the top of the wings to fill in their shape and create a raised wing base.
- Attach small sections of blue wool to the top of the wings using the shingle or fur technique. Cover the top of the wings and trim the wool to shape it.
- Examine your bird to check for any bare spots that you might need to fill in. Once you’re happy with the look, your tiny bird is complete!
Wrapping fabric around the outer embroidery hoop
I followed a wonderful blog post from Little Lion Stitchery to learn how to wrap an embroidery hoop in fabric. Check out the blog post for step-by-step instructions or watch the video below.
- Separate the two hoops and remove the screw from the outer hoop. Set the inner hoop and the screw aside. You’ll only be wrapping the outer hoop with fabric.
- Cut a piece of fabric slightly larger than the hoop. Tack the fabric to the top and bottom of the embroidery hoop using a small dab of hot glue.
- Glue the fabric to the inside of one side of the hoop using a thick craft glue. I worked with 1-2” of fabric at a time, applying the glue with a toothpick to make it easier to control.
- Repeat this process to glue the fabric to the other side of the hoop.
- I glued a jute trim to the front edge of the inner hoop to add texture. Just add tiny dots of hot glue to a 1” of the hoop, hold the trim in place to glue it, and continue working your way around the hoop.
- Set the hoops aside to dry.
- Place the hoops back together and reattach the screw to hold them together.
Perch the bird in the hoop
- Position the bird in the desired spot and hot glue one foot at a time. Allow the glue to cool before moving on to the next foot.
- Bend the tips of the toes down the front of the hoop to create the appearance of the bird grabbing it.
- Attach a hanger to the hoop using ribbon, jute, raffia, or baker’s twine. Cut a 9-10” piece of ribbon, thread it through the embroidery hoop hardware, and tie a knot.
And there you have it! Your tiny bluebird in a tiny hoop is complete. Feel free to customize the bird and the hoop for different decors or personalize it to match someone’s favorite colors. It’s a great way to use up leftover wool from previous projects. You can also create other birds using this same pattern as I did with my goldfinch.
The photos of real bluebird in the video is from the following photographers
- Eastern Bluebird resting by Andy Morffew from Itchen Abbas, Hampshire, UK, CC BY 2.0, via Wikimedia Commons


.jpg)