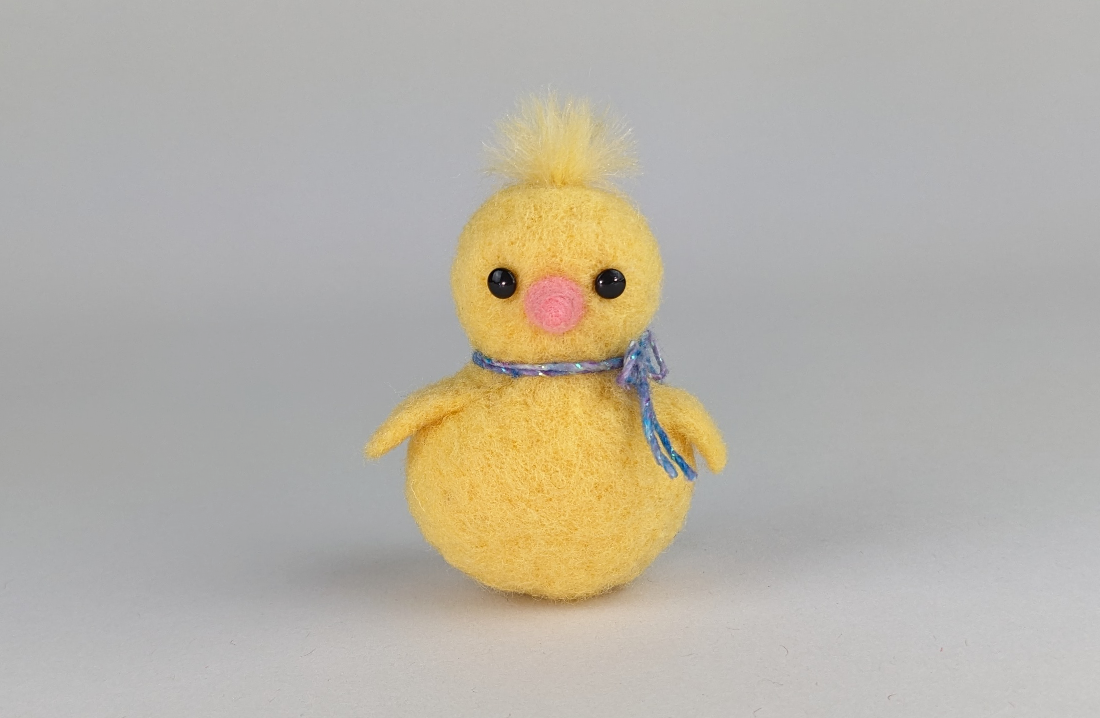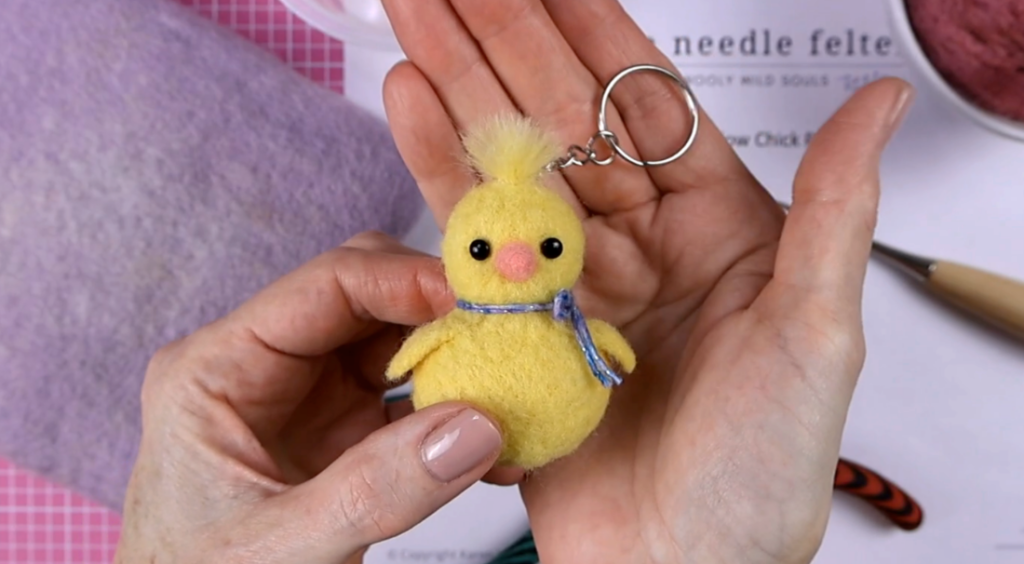
Ready for a super-cute and surprisingly quick needle felting project? In this post, I’m sharing a FREE pattern and tutorial to make an adorable yellow chick keychain! This little friend is perfect for Spring, Easter, or just to brighten your day. Plus, it’s a great project for beginners, and you can easily whip one up in under 40 minutes!
PLEASE NOTE: The chick’s head should be 1″ wide. In the video I said 1/2″ by mistake.
Download your Free Chick Keychain PDF Pattern, watch the video, and let’s get felting!
This project is also the perfect opportunity to make a quick gift, something to sell at your next Spring craft fair, or use as a building block in your next project. It has great potential for any needle felters of all skill levels!
This new project is part two of our Needle Felting Basics series, and is the follow-up to FAQ #5 on creating basic needle felting ball and egg shapes.
In this video & blog post you’ll discover:
- A step-by-step tutorial for creating the chick keychain!
- A list of all the tools and supplies you’ll need to get started.
- FREE yellow chick keychain pattern
- Tips for assembling the keychain and adding charming details
- Opportunities to use this pattern as a gateway for future needle felting projects
I hope you have fun creating your adorable chick!
Are there any questions I didn’t address? Did you find my advice helpful? Leave a comment at YouTube insert video link for me! I will be planning my future videos based on your questions. Also, please check out the playlist for my FAQ series on needle felting if you missed any of the previous videos.
Don’t forget to subscribe to my YouTube channel and bookmark this website so you don’t miss any of my tutorials or other content.
Tools and supplies used in this project

I have included Amazon affiliate links for some of the items below. This means I may earn a small commission (at no extra cost to you) if you click through and make a purchase. Thank you in advance if you decide to support my work using these links. Doing so helps me continue to create content for you!
Tools
- Felting Needles 36 Star (Coarse)
- Felting Needles 38 Star (Medium)
- Felting Needles 40 Twist/Spiral (Fine)
- Wool Buddy Felting Mat Small
- 12” Bamboo Skewer
- Awl With Wood Handle (Large)
- Fiskars Micro-Tip Easy Action Shears Scissors
- Wire Flush Cutters
- 2 pairs of Chain Nose Pliers
- Short Stem Ball Head Pins
- Pink Double-Sided Self-Healing Cutting Mat 18″X24″ https://amzn.to/4bM4cN1
Supplies
- Sarafina Fiber Art Off-White Chunky Core Wool
- Living Felt MC-1 Merino Batt in Lemon Peel (out of stock) – substitute another chick colored wool!
- Sarafina Plumage by DHG: Duck Fluff (merino/silk/viscose blend)
- Scrap of merino combed top in a salmon pink color for the chick’s beak
- 5 mm Black Glass Eyes
- 10 inches or 25 cm of yarn, embroidery floss, or a narrow ribbon
- E6000 Glue
- Elmer’s Glue-All Multipurpose Glue
- Split Ring Keyring with Chain and Jump Rings, Silver Color
- Disappearing Ink or Air erase Marker
Step-by-step instructions
- Pulling off about a 5” x 2” x ½” piece of core wool for the chick’s body.
- Wrap it around a bamboo skewer to make a 1 1/2″ wide ball or oval (I make more of an oval shape).
- Tack the ends of your shape in with a coarse felting needle. Gently slide it off the skewer.
- Felt the chick’s body until it firms up.
- Repeat the process to make the head but make it more of a round ball shape. Pull off about a 3” x 2” x ½” piece of core wool for the chick’s head.
- Roll the head tightly on the skewer to a make a ball about an inch wide.
- Tack the ends in with a coarse felting needle. Gently slide it off the skewer.
- Felt the head until if firms up.
- Tear off a small amount of wool about the size of the head. Place it between the body and the head.
- Start felting the head in place by stabbing the base of the neck into the body.
- Also stab the body up into the head to secure them together.
- Felt in any leftover bits of wool around the neck. Give the head a gentle tug to test that it is attached.
- Cover the head and body with yellow top coat.
- Pull off two thin layers of yellow top coat about 1” long and 1” wide.
- Roll these into very soft egg shapes.
- Keep the wide end loose and fluffy to attach to the body. Flatten the bottom 2/3s of each wing with your felting needle.
- Flip and felt the pointed ends of the wings more firmly to help them hold their shape. Set the wings aside.
- Pull or tear off about a 1 ½” by ¼” piece of pink top coat for the beak. Wrap this tightly around the pointed tip of the bamboo skewer. This will make a mini egg shape beak.
- Gently slide it off the skewer and felt the pointed half so it holds together. Leave the wider end a little fluffy to help attach it to the face.
- Place the beak on the face. Felt it in place by stabbing it around the base. Give it a gentle tug to test it.
- Use ball head pins to determine where you want to place your eyes.
- Trim the wire on your eyes so they don’t go more than half way through the head.
- Lift the pin up and felt a little depression or divot for the eye to set into.
- As you remove the pin, make a dot with the air erase marker for each eye.
- Use the awl to poke a hole for the eye wire.
- Place your eyes in the hole to verify that you are happy with their position.
- Remove one eye and re-poke the hole so it doesn’t close up. Add a little E6000 glue to the wire. Insert the wire in the hole.
- Repeat for the second eye.
- Tear off a small amount of wool about 2 1/2” long to make the tuft on the top of the head.
- Put a small dot of water-based craft glue on the top of the head.
- Place the tuft on the glue and felt it down the middle.
- Flip the tuft to the left and felt it. Flip the tuft to the right and felt it.
- Trim the tuft to the length you prefer.
- Pin the wings in place. Check them from different angles.
- Felt the wide ends in place to attach them to the body.
- Tie a bit of yarn or floss or ribbon around the chick’s neck.
- Poke a channel in the top of the head for the keychain metal jumpring.
- Thread the jumpring through the hole.
- Add the keychain to the jumpring and close the loop. Your quick yellow chick keychain is done!
The yellow chick without the keychain
If you’d like, you can also make the chick without the keychain. It looks adorable glued to a tiny wood slice, as a pin, or attach a charm clasp to hang if from a backpack. Make a whole flock in different colors!